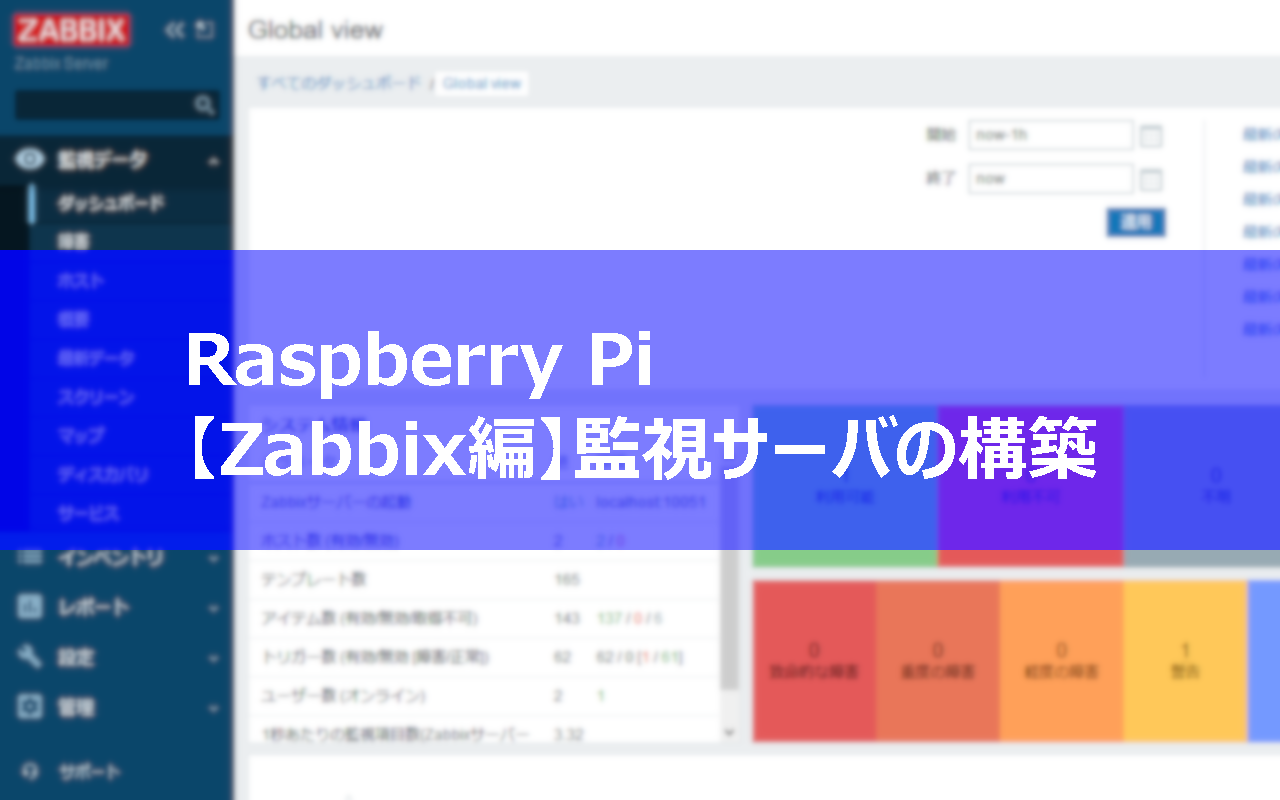
はじめに
本記事では、Raspberry Piで、Zabbixソフトウェアを使用して、監視サーバを構築する方法について記載いたします。
Zabbixは、オープンソース・ソフトウェアとして開発されており、無料でダウンロードして使用することができます。Zabbixを使用すると、ネットワーク機器やサーバなどITインフラストラクチャ・コンポーネントの可用性やパフォーマンスを監視することができます。エンタープライス向けソフトウェアです。
環境
- ボード
Raspberry Pi 3 Model B+(Raspberry Pi 4 Model Bでも同様です。) - OS
Raspberry Pi OS Lite
Release date: January 11th 2021
Kernel version: 5.4
Zabbix監視サーバの動作環境
Zabbixは、Apache Webサーバ(HTTPサーバ)、主なデータベースエンジン、およびPHPスクリプト言語を組み合わせて動作します。本記事では動作環境として、以下を使用します。
- Webサーバ(フロントエンドWebサーバ)
Apache Webサーバ(Version:2.4.38 (Raspbian))(推奨:1.3.12以降) - PHPスクリプト言語
PHP(Version: 7.4.13)(推奨:7.2.5以降) - データベース管理システム(バックエンドデータベース)
MariaDBデータベースサーバ(Version:10.3)(推奨:10.0.37以降)
Raspberry Piのセットアップ
はじめに、基本的なRaspberry Pi(Raspberry Pi OS)のセットアップを行います。
パッケージの更新
インストールされている各種パッケージを更新し、Raspberry Pi OSを最新の状態にします。
pi@raspberrypi:~ $ sudo apt update
pi@raspberrypi:~ $ sudo apt upgrade
pi@raspberrypi:~ $
パッケージの更新が完了したら、Raspberry Piを最新の状態で起動するため、再起動を行います。
pi@raspberrypi:~ $ sudo rebootタイムゾーン及びロケールの設定
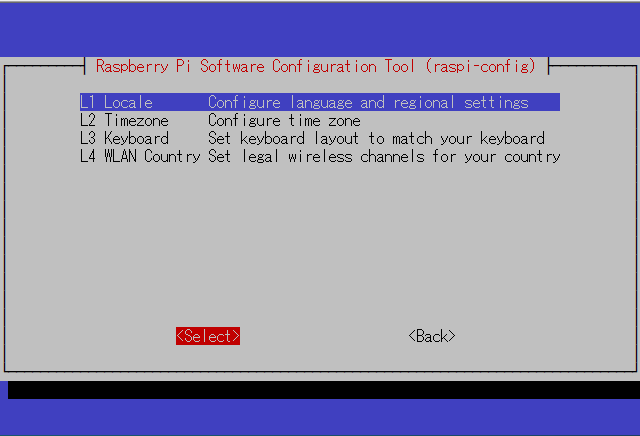
次に、raspi-configコマンド使用して、タイムゾーン及びロケールの変更を行います。
pi@raspberrypi:~ $ sudo raspi-config
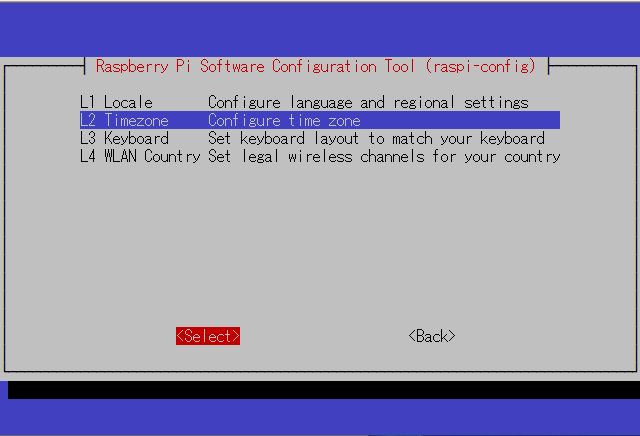
pi@raspberrypi:~ $「5 Localisation Options」を選択し、「<Select>」を選択します。

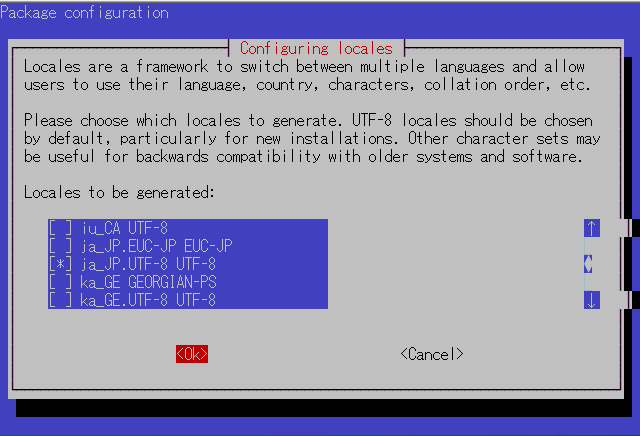
「L1 Locale」を選択し、「<Select>」を選択します。
「ja_JP.UTF-8 UTF-8」を選択し、「<Ok>」を選択します。
「5 Localisation Options」を選択し、「<Select>」を選択します。
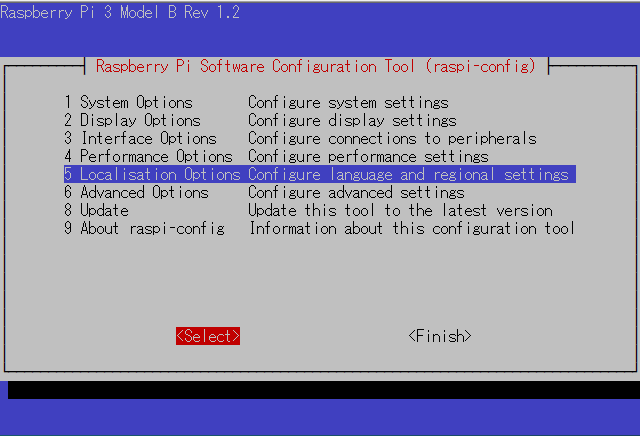
「L3 Timezone」を選択し、「<Select>」を選択します。
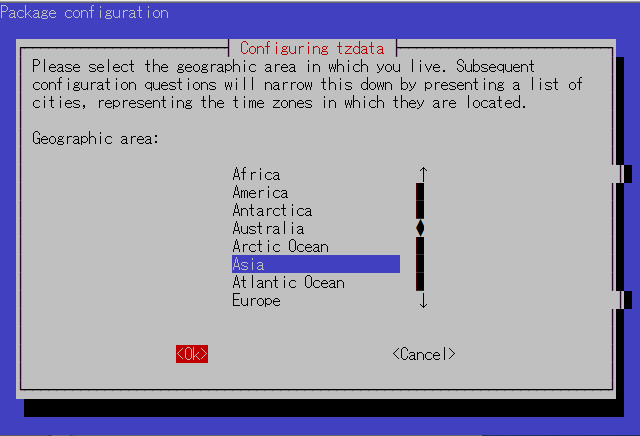
「Asia」を選択し、「<Ok>」をクリックします。
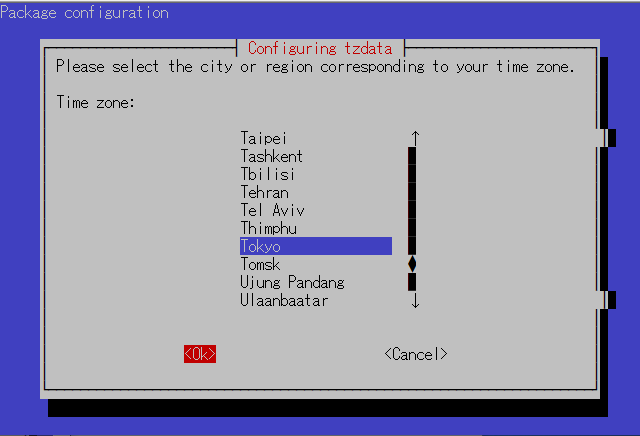
「Tokyo」を選択し、「<Ok>」を選択します。
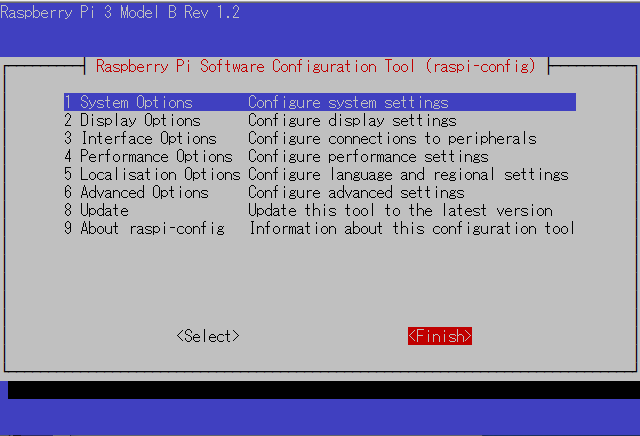
「<Finish>」を選択し、終了します。
Apacheのインストール
フロントエンドのWebサーバとして使用するApache Webサーバのインストールを行います。
Apache(アパッチ)は、世界中で使用されているWebサーバソフトウェアです。Zabbix監視サーバのフロントエンドのWebサーバとして使用されます。
pi@raspberrypi:~ $ sudo apt install apache2
pi@raspberrypi:~ $
インストールされたバージョンを確認します。
pi@raspberrypi:~ $ apache2 -v
Server version: Apache/2.4.38 (Raspbian)
Server built:   2020-08-25T20:08:29
pi@raspberrypi:~ $
PHPのインストール
PHPスクリプト言語のインストールを行います。Raspberry Pi OSの標準のaptリポジトリでは、PHP7.3のインストールしかできないため、ここでは、SURYのPPA(Personal Package Archive)リポジトリを使用して、PHP7.4をインストールします。
必要なパッケージのインストール
はじめに、SURY PPAリポジトリを使用する上で必要なパッケージのインストールを行います。
pi@raspberrypi:~ $ sudo apt install lsb-release apt-transport-https ca-certificates
pi@raspberrypi:~ $
GPGキーのダウンロードと保存
SURY PPAリポジトリを使用する際に必要になるGPGキーファイルのダウンロードと保存を行います。
pi@raspberrypi:~ $ sudo wget -O /etc/apt/trusted.gpg.d/php.gpg https://packages.sury.org/php/apt.gpg
pi@raspberrypi:~ $
SURY PPAリポジトリの追加
SURY PPAリポジトリをaptリポジトリに追加します。
pi@raspberrypi:~ $ echo "deb https://packages.sury.org/php/ $(lsb_release -sc) main" | sudo tee /etc/apt/sources.list.d/php.list
pi@raspberrypi:~ $
パッケージ一覧の更新
SURY PPAリポジトリを使用して、パッケージ一覧を更新します。
pi@raspberrypi:~ $ sudo apt update
pi@raspberrypi:~ $
パッケージの更新
更新可能なパッケージがある場合は、パッケージの更新を行います。
pi@raspberrypi:~ $ sudo apt upgrade
pi@raspberrypi:~ $
PHP7.4のインストール
PHP7.4のインストールを行います。
pi@raspberrypi:~ $ sudo apt install php7.4
pi@raspberrypi:~ $
バージョン確認
インストールを行ったPHPのバージョンを確認します。
pi@raspberrypi:~ $ php -v
PHP 7.4.13 (cli) (built: Nov 30 2020 20:40:09) ( NTS )
Copyright (c) The PHP Group
Zend Engine v3.4.0, Copyright (c) Zend Technologies
    with Zend OPcache v7.4.13, Copyright (c), by Zend Technologies
pi@raspberrypi:~ $
PHPモジュールのインストール
Zabbix監視サーバを動作させる上で必要なPHPモジュールのインストールを行います。
pi@raspberrypi:~ $ sudo apt install php7.4-gd php7.4-bcmath php7.4-xml php7.4-mbstring php7.4-mysql
pi@raspberrypi:~ $
PHPの設定
「/etc/php/7.4/apache2/php.ini」ファイルを以下のとおり、編集します。
pi@raspberrypi:~ $ sudo vi /etc/php/7.4/apache2/php.ini
pi@raspberrypi:~ $
【編集内容】
~(略)~
[mbstring]
; language for internal character representation.
; This affects mb_send_mail() and mbstring.detect_order.
; http://php.net/mbstring.language
mbstring.language = Japanese   <== コメントアウト解除
~(略)~
php-fpmのインストール
Apache WebサーバからPHPを使用する際に必要になるphp-fpmのインストールを行います。
php-fpmは、FPM(FastCGI Process Manager)と言われるPHPのFastCGI実装のひとつです。
pi@raspberrypi:~ $ sudo apt install php7.4-fpm
パッケージリストを読み込んでいます... 完了
~(中略)~
Creating config file /etc/php/7.4/fpm/php.ini with new version
NOTICE: Not enabling PHP 7.4 FPM by default.
NOTICE: To enable PHP 7.4 FPM in Apache2 do:
NOTICE: a2enmod proxy_fcgi setenvif
NOTICE: a2enconf php7.4-fpm
NOTICE: You are seeing this message because you have apache2 package installed.
Created symlink /etc/systemd/system/multi-user.target.wants/php7.4-fpm.service → /lib/systemd/system/php7.4-fpm.service.
man-db (2.8.5-2) のトリガを処理しています ...
systemd (241-7~deb10u5+rpi1) のトリガを処理しています ...
php7.4-fpm (7.4.13-1+0~20201130.33+debian10~1.gbpd59941) のトリガを処理しています ...
NOTICE: Not enabling PHP 7.4 FPM by default.
NOTICE: To enable PHP 7.4 FPM in Apache2 do:
NOTICE: a2enmod proxy_fcgi setenvif
NOTICE: a2enconf php7.4-fpm
NOTICE: You are seeing this message because you have apache2 package installed.
pi@raspberrypi:~ $
Apache Webサーバの再起動を行います。
pi@raspberrypi:~ $ sudo systemctl restart apache2
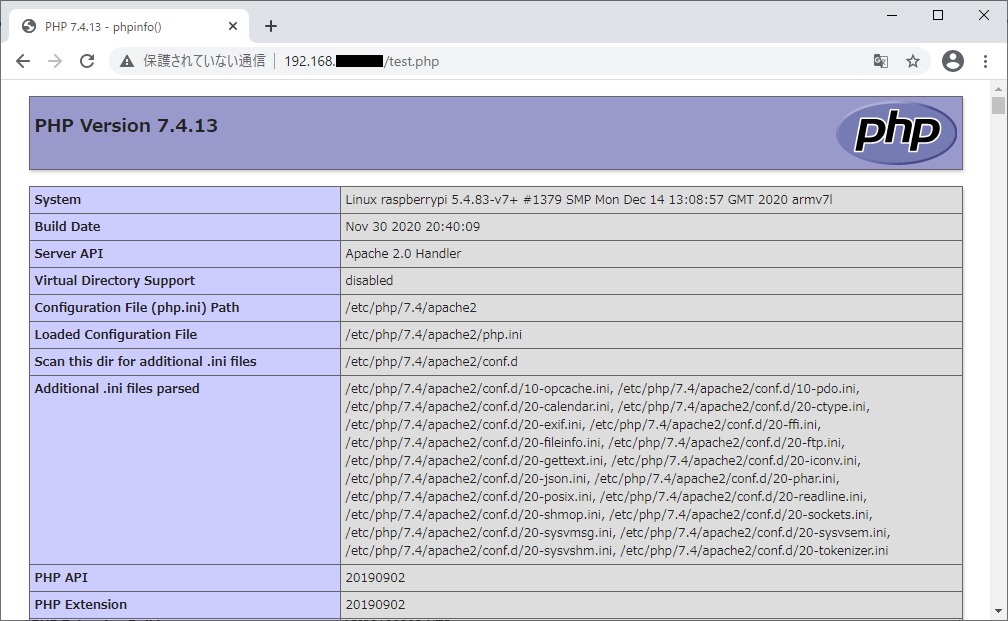
pi@raspberrypi:~ $PHP環境の動作確認
Apache Webサーバのドキュメント・ルート・ディレクトリに、以下のテスト用ファイル「test.php」を作成し、PHPの動作確認を行います。
pi@raspberrypi:~ $ vi /var/www/html/test.php
pi@raspberrypi:~ $
【記載内容】
<?php
        phpinfo();
?>
Webブラウザを使用して、以下のURLにアクセスに、PHPの各種情報が表示されることを確認します。
URL:http://<IPアドレス または、ドメイン名>/test.php
MariaDBのインストール
バックエンドデータベースとして使用するMariaDBデータベースのインストールを行います。
MariaDBは、MySQLから派生したオープンソースソフトウェアのリレーショナルデータベース管理システム(RDBMS)で、無料で使用することができます。また、MySQLと高い互換性を有しています。
MariaDBのインストール
本記事では、標準のaptリポジトリからインストールできる「Version 10.3」をインストールします。
pi@raspberrypi:~ $ sudo apt install mariadb-server-10.3
pi@raspberrypi:~ $
MariaDBの初期設定
MariaDBの初期設定を行います。「mysql_secure_installation」スクリプトを使用して、MariaDBのセキュリティオプション等の設定を行います。
pi@raspberrypi:~ $ sudo  mysql_secure_installation

NOTE: RUNNING ALL PARTS OF THIS SCRIPT IS RECOMMENDED FOR ALL MariaDB
      SERVERS IN PRODUCTION USE!  PLEASE READ EACH STEP CAREFULLY!

In order to log into MariaDB to secure it, we'll need the current
password for the root user.  If you've just installed MariaDB, and
you haven't set the root password yet, the password will be blank,
so you should just press enter here.

Enter current password for root (enter for none):    <== [enter]を押します。
OK, successfully used password, moving on...

Setting the root password ensures that nobody can log into the MariaDB
root user without the proper authorisation.

Set root password? [Y/n] Y   <== rootパスワード設定するため、[Y]を入力します。
New password:    <== パスワードを入力します。
Re-enter new password:   <== 再度パスワードを入力します。
Password updated successfully!
Reloading privilege tables..
 ... Success!


By default, a MariaDB installation has an anonymous user, allowing anyone
to log into MariaDB without having to have a user account created for
them.  This is intended only for testing, and to make the installation
go a bit smoother.  You should remove them before moving into a
production environment.

Remove anonymous users? [Y/n] Y    <== 匿名ユーザーを削除するため、[Y]を入力します。
 ... Success!

Normally, root should only be allowed to connect from 'localhost'.  This
ensures that someone cannot guess at the root password from the network.

Disallow root login remotely? [Y/n] Y    <== リモート接続を拒否するため、[Y]を入力します。
 ... Success!

By default, MariaDB comes with a database named 'test' that anyone can
access.  This is also intended only for testing, and should be removed
before moving into a production environment.

Remove test database and access to it? [Y/n] Y    <== 不要なテストデータベースを削除するため
 - Dropping test database...                      <== [Y]を入力します。
 ... Success!
 - Removing privileges on test database...
 ... Success!

Reloading the privilege tables will ensure that all changes made so far
will take effect immediately.

Reload privilege tables now? [Y/n] Y    <== これまでに設定した内容を反映するため
 ... Success!                           <== [Y]を入力します。

Cleaning up...

All done!  If you've completed all of the above steps, your MariaDB
installation should now be secure.

Thanks for using MariaDB!
pi@raspberrypi:~ $
初期設定の変更
インストール直後の初期状態では、以下のように、「mysql -u root -p」コマンドで接続することができません。「sudo mysql -u root -p」コマンドでは、接続できる状態になっています。
pi@raspberrypi:~ $ mysql -u root -p
Enter password:
ERROR 1698 (28000): Access denied for user 'root'@'localhost'
pi@raspberrypi:~ $ sudo mysql -u root -p
Enter password:
Welcome to the MariaDB monitor.  Commands end with ; or \g.
Your MariaDB connection id is 59
Server version: 10.3.27-MariaDB-0+deb10u1 Raspbian 10

Copyright (c) 2000, 2018, Oracle, MariaDB Corporation Ab and others.

Type 'help;' or '\h' for help. Type '\c' to clear the current input statement.

MariaDB [(none)]> quit
Bye
pi@raspberrypi:~ $
このため、以下のSQLコマンドを実行し、「mysql -u root -p」コマンドで接続できるように変更します。
pi@raspberrypi:~ $ sudo mysql -u root -p
Enter password:
Welcome to the MariaDB monitor.  Commands end with ; or \g.
Your MariaDB connection id is 64
Server version: 10.3.27-MariaDB-0+deb10u1 Raspbian 10

Copyright (c) 2000, 2018, Oracle, MariaDB Corporation Ab and others.

Type 'help;' or '\h' for help. Type '\c' to clear the current input statement.

MariaDB [(none)]> grant all privileges on *.* to root@localhost identified by 'password' with grant option;
Query OK, 0 rows affected (0.001 sec)

MariaDB [(none)]> flush privileges;
Query OK, 0 rows affected (0.001 sec)

MariaDB [(none)]> quit
Bye
pi@raspberrypi:~ $
「mysql -u root -p」で接続できることを確認します。
pi@raspberrypi:~ $ mysql -u root -p
Enter password:
Welcome to the MariaDB monitor.  Commands end with ; or \g.
Your MariaDB connection id is 66
Server version: 10.3.27-MariaDB-0+deb10u1 Raspbian 10

Copyright (c) 2000, 2018, Oracle, MariaDB Corporation Ab and others.

Type 'help;' or '\h' for help. Type '\c' to clear the current input statement.

MariaDB [(none)]> quit
Bye
pi@raspberrypi:~ $
Zabbix監視サーバのインストール
フロントエンドWebサーバ、バックエンドデータベースサーバおよびPHPスクリプト言語の動作環境の準備が整いましたので、いよいよ、Zabbix監視サーバのインストールを行います。
Zabbixリポジトリの追加
Zabbixパッケージをインストールするために使用するZabbixリポジトリファイルをダウンロードします。
pi@raspberrypi:~ $ wget https://repo.zabbix.com/zabbix/5.2/raspbian/pool/main/z/zabbix-release/zabbix-release_5.2-1+debian10_all.deb
pi@raspberrypi:~ $ ls -l
合計 4
-rw-r--r-- 1 pi pi 3468 10月 26 16:55 zabbix-release_5.2-1+debian10_all.deb
pi@raspberrypi:~ $次に、ダウンロードしたリポジトリファイルを使用して、Zabbixリポジトリを追加します。
pi@raspberrypi:~ $ sudo dpkg -i zabbix-release_5.2-1+debian10_all.deb
pi@raspberrypi:~ $
Zabbixリポジトリを使用して、パッケージ一覧を更新します。
pi@raspberrypi:~ $ apt update
pi@raspberrypi:~ $
Zabbixパッケージのインストール
Zabbixサーバ、フロントエンド、agentパッケージのインストールを行います。
pi@raspberrypi:~ $ sudo apt install zabbix-server-mysql zabbix-frontend-php zabbix-apache-conf zabbix-agent
pi@raspberrypi:~ $
初期データベースの作成
MariaDBデータベースサーバが起動していることを確認します。
pi@raspberrypi:~ $ systemctl status mariadb
● mariadb.service - MariaDB 10.3.27 database server
   Loaded: loaded (/lib/systemd/system/mariadb.service; enabled; vendor preset: enabled)
   Active: active (running) since Sat 2021-01-30 13:10:53 JST; 1h 7min ago
     Docs: man:mysqld(8)
           https://mariadb.com/kb/en/library/systemd/
 Main PID: 14821 (mysqld)
   Status: "Taking your SQL requests now..."
    Tasks: 30 (limit: 2063)
   CGroup: /system.slice/mariadb.service
           mq14821 /usr/sbin/mysqld

 1月 30 13:10:55 raspberrypi /etc/mysql/debian-start[14859]: Phase 6/7: Checking and upgrading tables
 1月 30 13:10:55 raspberrypi /etc/mysql/debian-start[14859]: Running 'mysqlcheck' with connection arguments:
 1月 30 13:10:55 raspberrypi /etc/mysql/debian-start[14859]: # Connecting to localhost...
 1月 30 13:10:55 raspberrypi /etc/mysql/debian-start[14859]: # Disconnecting from localhost...
 1月 30 13:10:55 raspberrypi /etc/mysql/debian-start[14859]: Processing databases
 1月 30 13:10:55 raspberrypi /etc/mysql/debian-start[14859]: information_schema
 1月 30 13:10:55 raspberrypi /etc/mysql/debian-start[14859]: performance_schema
 1月 30 13:10:55 raspberrypi /etc/mysql/debian-start[14859]: Phase 7/7: Running 'FLUSH PRIVILEGES'
 1月 30 13:10:55 raspberrypi /etc/mysql/debian-start[14859]: OK
 1月 30 13:10:56 raspberrypi /etc/mysql/debian-start[15084]: Triggering myisam-recover for all MyISAM tables
pi@raspberrypi:~ $
以下の通り、SQLコマンドを実行し、初期データベースを作成します。
ここでは、データベース名:「zabbix」、ユーザ名:「zabbix」、パスワード:「password」とします。
pi@raspberrypi:~ $ sudo mysql -u root -p
Enter password:  <== MariaDBのrootパスワードを入力
Welcome to the MariaDB monitor.  Commands end with ; or \g.
Your MariaDB connection id is 59
Server version: 10.3.27-MariaDB-0+deb10u1 Raspbian 10

Copyright (c) 2000, 2018, Oracle, MariaDB Corporation Ab and others.

Type 'help;' or '\h' for help. Type '\c' to clear the current input statement.

MariaDB [(none)]> create database zabbix character set utf8 collate utf8_bin;  <== データベースを作成
Query OK, 1 row affected (0.001 sec)

MariaDB [(none)]> create user zabbix@localhost identified by 'password';  <== ユーザを作成
Query OK, 0 rows affected (0.001 sec)

MariaDB [(none)]> grant all privileges on zabbix.* to zabbix@localhost;  <== 権限を設定
Query OK, 0 rows affected (0.001 sec)

MariaDB [(none)]> quit
Bye
pi@raspberrypi:~ $
初期スキーマ及びデータのインポート
作成した「zabbix」データベースに、Zabbixで使用する初期スキーマとデータをインポートします。
pi@raspberrypi:~ $ zcat /usr/share/doc/zabbix-server-mysql*/create.sql.gz | mysql -uzabbix -p zabbix
Enter password:  <== MariaDBのrootパスワードを入力
pi@raspberrypi:~ $
Zabbixサーバの接続データベース設定
Zabbixサーバが接続して使用するバックエンドデータベースに関する設定を行います。
「DBName」、「DBUser」はデフォルトで設定されていますが、「DBPassword」は設定されていません。「/etc/zabbix/zabbix_server.conf」ファイルを編集し設定を行います。
pi@raspberrypi:~ $ sudo vi /etc/zabbix/zabbix_server.conf
~(略)~
### Option: DBPassword
#       Database password.
#       Comment this line if no password is used.
#
# Mandatory: no
# Default:
# DBPassword=
DBPassword=password  <== パスワードを記入

### Option: DBSocket
~(略)~
pi@raspberrypi:~ $
Zabbixサーバおよびagentプロセスの起動
以下のコマンドを実行し、Zabbixサーバおよびagentプロセスを起動するとともに、Apache Webサーバを再起動します。
pi@raspberrypi:~ $ sudo systemctl restart zabbix-server zabbix-agent apache2
pi@raspberrypi:~ $
Zabbixサーバ、agentプロセスの起動確認を行います。
pi@raspberrypi:~ $ systemctl status apache2
● apache2.service - The Apache HTTP Server
   Loaded: loaded (/lib/systemd/system/apache2.service; enabled; vendor preset: enabled)
   Active: active (running) since Sat 2021-01-30 14:53:30 JST; 1min 32s ago
     ~(中略)~
 1月 30 14:53:30 raspberrypi systemd[1]: Started The Apache HTTP Server.
pi@raspberrypi:~ $
pi@raspberrypi:~ $ systemctl status zabbix-server
● zabbix-server.service - Zabbix Server
Loaded: loaded (/lib/systemd/system/zabbix-server.service; disabled; vendor preset: enabled)
Active: active (running) since Sat 2021-01-30 14:53:29 JST; 2min 1s ago
~(中略)~
1月 30 14:53:29 raspberrypi systemd[1]: Started Zabbix Server.
pi@raspberrypi:~ $pi@raspberrypi:~ $ systemctl status zabbix-agent
● zabbix-agent.service - Zabbix Agent
Loaded: loaded (/lib/systemd/system/zabbix-agent.service; enabled; vendor preset: enabled)
Active: active (running) since Sat 2021-01-30 14:53:29 JST; 3min 32s ago
~(中略)~
1月 30 14:53:29 raspberrypi systemd[1]: Started Zabbix Agent.
pi@raspberrypi:~ $Zabbixサーバおよびagentプロセスの自動起動設定
システムの起動時に、Zabbixサーバとagentプロセスが自動起動するように設定を行います。
pi@raspberrypi:~ $ sudo systemctl enable zabbix-server zabbix-agent
Synchronizing state of zabbix-server.service with SysV service script with /lib/systemd/systemd-sysv-install.
Executing: /lib/systemd/systemd-sysv-install enable zabbix-server
Synchronizing state of zabbix-agent.service with SysV service script with /lib/systemd/systemd-sysv-install.
Executing: /lib/systemd/systemd-sysv-install enable zabbix-agent
Created symlink /etc/systemd/system/multi-user.target.wants/zabbix-server.service → /lib/systemd/system/zabbix-server.service.
pi@raspberrypi:~ $
Zabbixフロントエンドの設定
ZabbixフロントエンドのWebインターフェイスに関する設定を行います。
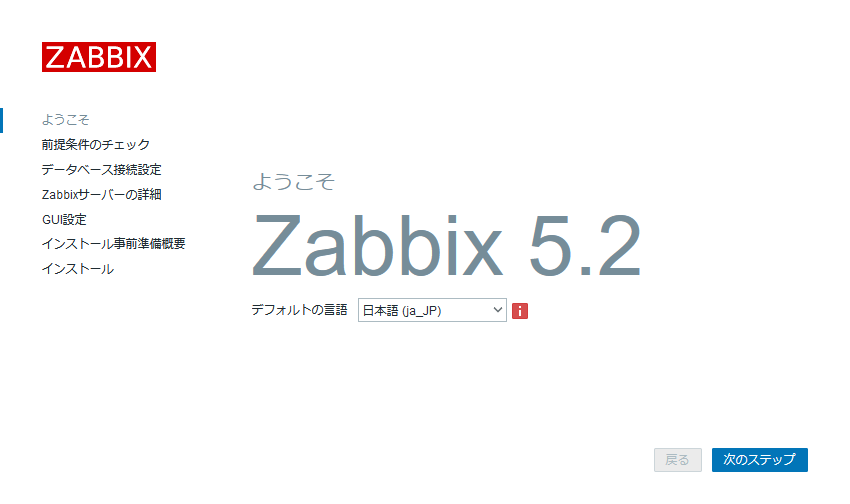
ブラウザで、ZabbixフロントエンドURLを開きます。パッケージからZabbixをインストールした場合のURLは次のとおりです。
http://<IPアドレス または ホスト名>/zabbix/
フロントエンドのインストールウィザードの最初の画面が表示されます。
[デフォルト言語]ドロップダウンメニューを使用して、システムのデフォルト言語を変更し、「次のステップ」ボタンをクリックします。(※選択した言語でインストールプロセスが続行されます。)
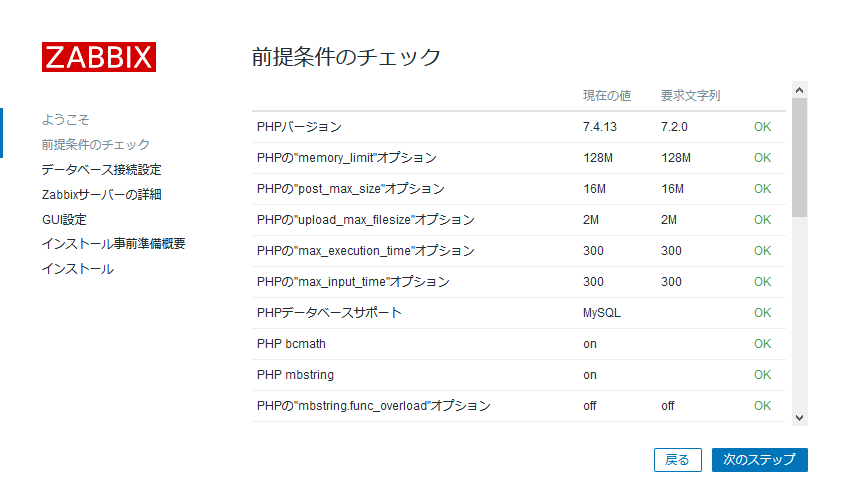
すべてのソフトウェアの前提条件が満たされていることを確認します。満たされている場合は、「次のステップ」ボタンをクリックします。
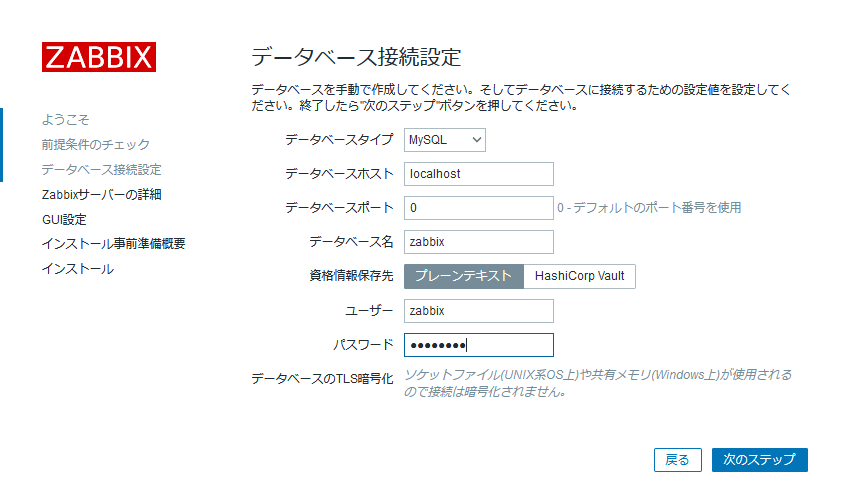
上記で作成したZabbixデータベースに接続するための詳細情報を入力します。
以下の情報を入力し、「次のステップ」ボタンをクリックします。
- [データベースタイプ]:Mysqlを選択します。
- [データベースホスト]:localhostと入力します。
- [データベースポート]:0を入力します。(デフォルトのポートを使用します。)
- [データベース名]:作成したデータベース名「zabbix」を入力します。
- [資格情報保存先]:[プレーンテキスト]を選択します。
- [ユーザー]:作成した「zabbix」と入力します。
- [パスワード]:「zabbix」ユーザーのパスワードを入力します。
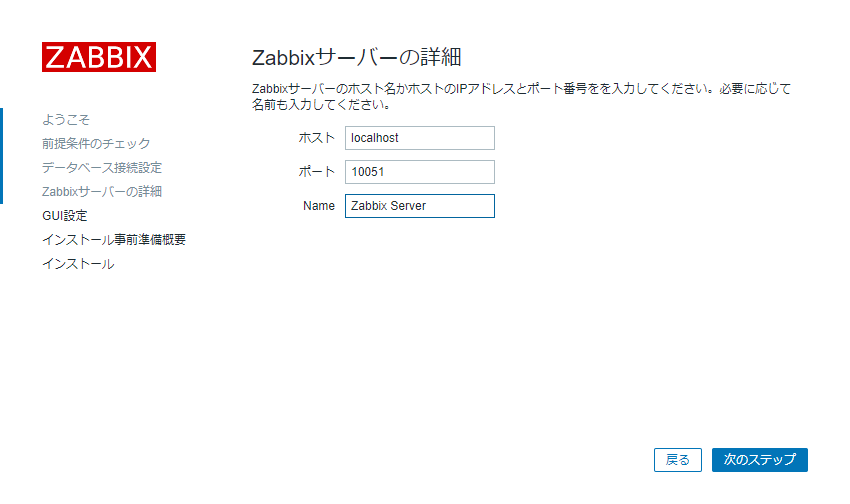
Zabbixサーバの詳細情報を入力します。
以下の情報を入力し、「次のステップ」ボタンをクリックします。
- [ホスト]:「localhost」(特に変更の必要はありません。)
- [ポート]:「10051」(特に変更の必要はありません。)
- [Name]:ここでは、「Zabbix Server」と入力します。
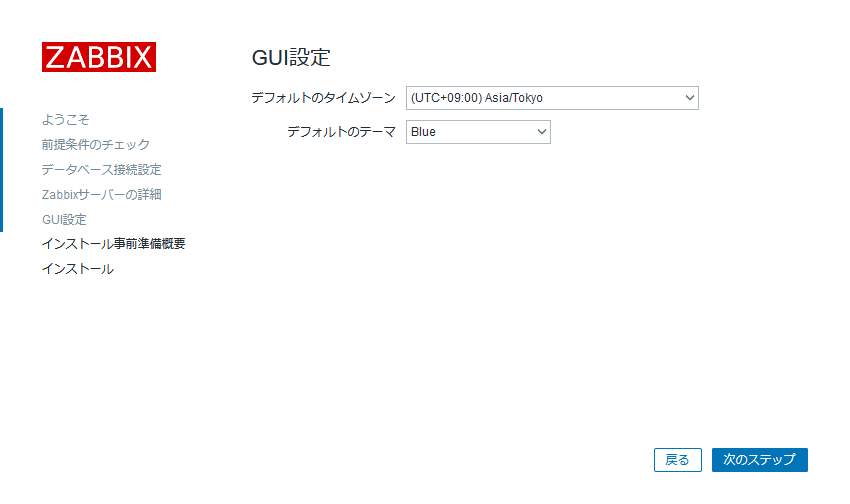
フロントエンドのデフォルトのタイムゾーンとテーマを設定し、「次のステップ」ボタンをクリックします。
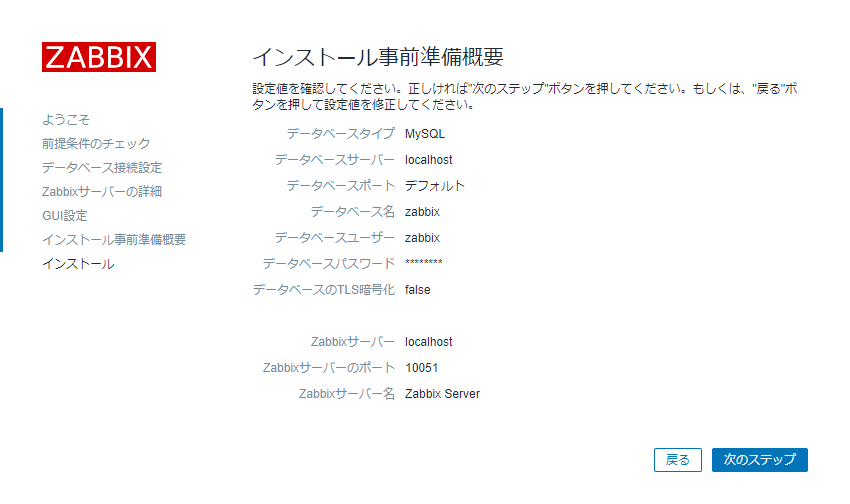
設定の概要を確認、「次のステップ」ボタンをクリックします。
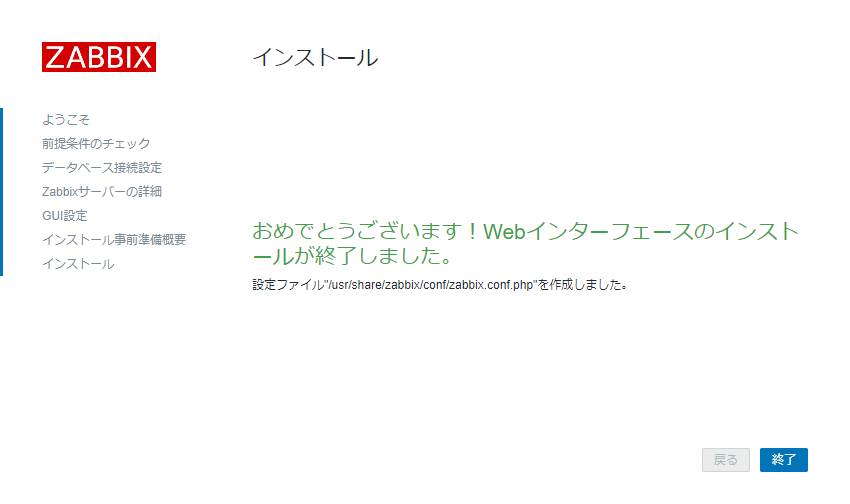
問題がなければ、以下の画面が表示されますので、「終了」ボタンをクリックします。
Zabbixサーバのフロントエンドの準備ができましたので、ユーザー名およびパスワードを入力し、「サインイン」ボタンをクリックします。
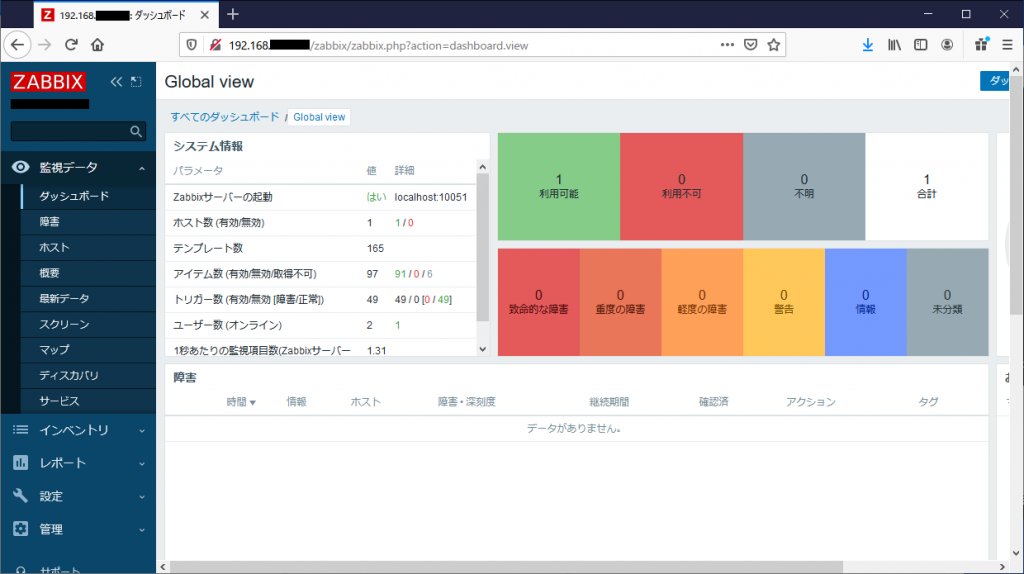
問題なくログインが完了し、以下の画面が表示されれば、Zabbix監視サーバのインストールおよび設定は完了です。
以上です。