
はじめに
本記事では、AlmaLinux 9.6を使用して、開発・検証用のWordPressサーバを構築する方法について記載いたします。実際に公開しているホームページのデザインなどを試行錯誤しながら変更することはなかなかできません。このため、実際に表示されるページを確認しながら、自由にデザインなどを試行錯誤できるWordPressの環境を構築する方法について記載いたします。
環境
・OS
AlmaLinux 9.6
・Apache
Apache 2.4(php-fpmを使用)
・PHP
PHP 8.3
・MariaDB
MariaDB 11.8(Community版)
・WordPress
WordPress 6.8.2(2025年08月11日時点での最新バージョン)
ドキュメントルート「/var/www/html/」配下にWordPressのファイルを配置
事前準備
はじめに、WordPressを動作させるための実行環境(LAMP環境)を構築します。
LAMP環境とは
Linux OSに、Apache、MariaDB、PHPをインストールした環境のことです。
頭文字を取って、LAMPと言います。
Apache2サーバのインストール
標準リポジトリを使用して、Apache2サーバをインストールします。
[root@localhost ~]# dnf list | grep httpd
~(省略)~
httpd.x86_64    2.4.62-4.el9    appstream
~(省略)~
[root@localhost ~]# dnf install httpd.x86_64
インストールしたApache2のバージョンを確認します。
[root@localhost ~]# httpd -v
Server version: Apache/2.4.62 (AlmaLinux)
Server built:   Jan 29 2025 00:00:00
[root@localhost ~]#
Apache2サーバの設定
ServerNameディレクティブの設定
Apache2サーバをインストールした直後のデフォルト設定では、「ServerName」ディレクティブが設定されていません。「/etc/httpd/conf/httpd.conf」ファイルを編集し、「ServerName」ディレクティブにサーバ名を記載します。
ここでは、サーバ名を「www.ingenious.jp」とします。記載するサーバ名は、ご使用の環境に応じて、適宜置き換えてください。
[root@localhost ~]# vi /etc/httpd/conf/httpd.conf
【記載内容】
#ServerName www.example.com:80  <-- コメントアウト
ServerName www.ingenious.jp  <-- サーバ名を記載
[root@localhost ~]#
DirectoryIndexディレクティブの設定変更
デフォルト設定では、Webブラウザからのリクエストが、ディレクトリだった場合やファイルが指定されなかった場合(最後が「/」で終る)に「index.html」ファイルが返される設定になっています。このため、WordPressのトップページである「index.php」ファイルが返されるように、設定変更を行います。以下のとおり、「/etc/httpd/conf/httpd.conf」ファイルを編集し、WordPressのトップページである「index.php」ファイルが最初に返されるように設定変更を行います。
[root@localhost ~]# vi /etc/httpd/conf/httpd.conf
【変更内容】
<IfModule dir_module>
#    DirectoryIndex index.html  <-- コメントアウト
    DirectoryIndex index.php index.html     <-- index.phpを先頭に追加
</IfModule>
[root@localhost ~]#
【参考】
DirectoryIndexディレクティブに記載した順にファイルが返されます。
Rewriteモジュールの有効化
WordPressでは、「.htaccess」ファイルに記載されているRewriteRuleに基づき、パーマリンクを実現しています。このため、Rewriteモジュールを有効化する必要があります。
【参考】
「.htaccess」ファイルは、ディレクトリ単位で制御を行う設定ファイルです。「.htaccess」ファイルを特定のディレクトリに配置すると、「.htaccess」ファイル内に記述されている設定内容が、配置されたディレクトリ内とその配下のディレクトリ内に対して適用されます。
Rewriteモジュールの状態は、以下のコマンドにより確認することができます。
[root@localhost ~]# httpd -M | grep rewrite
 rewrite_module (shared)
[root@localhost ~]#
※有効化されている場合、上記のように「rewrite_module (shared)」と表示されます。
【注意】
Rewriteモジュールが無効化されている状態で、投稿記事を作成し「下書き保存」や「公開」しようとすると、「更新に失敗しました。返答が正しいJSONレスポンスではありません。」と表示され、投稿記事を保存することができません。
また、既存の記事を閲覧しようとすると、「404 Not Found」と表示され閲覧ができません。
これらは、パーマリンクが適切に書き換えられないためです。
AllowOverrideの設定変更
デフォルト設定状態では、WordPressのファイルを配置するドキュメントルート「/var/www/html」配下の「.htaccess」ファイルに記載されているディレクティブは、すべて使用できないように無効化されています。このため、「.htaccess」ファイルに記述したディレクティブを使用できるように、以下のように「/etc/httpd/conf/httpd.conf」ファイルを編集する必要があります。
また、併せて、「index.php」が見つからなった場合に「/var/www/html」配下のディレクトリやファイルが一覧表示されないように変更します。
[root@localhost ~]# vi /etc/httpd/conf/httpd.conf
【編集内容】
# Further relax access to the default document root:
<Directory "/var/www/html">

    #Options Indexes FollowSymLinks  <-- コメントアウト
    Options FollowSymLinks  <-- 「Indexes」を削除

    #
    # AllowOverride controls what directives may be placed in .htaccess files.
    # It can be "All", "None", or any combination of the keywords:
    #   Options FileInfo AuthConfig Limit
    #
    #AllowOverride None  <-- コメントアウト
    AllowOverride All   <-- 「All」に変更

    Require all granted
</Directory>
[root@localhost ~]#
【参考】
「.htaccess」ファイルは、WordPressのファイルを配置したトップディレクトリに存在します。
本記事では、ドキュメントルート「/var/www/html/」ディレクトリに存在します。
【参考】
Optionsは、任意のディレクトリに対して使用できる機能を設定するためのディレクティブです。
| Indexes | ディレクトリに対するリクエストに対して、DirectoryIndexで指定したファイル (index.php等)が存在しない場合に、ディレクトリ内ファイルの一覧を表示します。 |
| FollowSymLinks | シンボリックリンクのリンク先を参照できるようにします。 |
【参考】
AllowOverrideは、「.htaccess」ファイルで使用できるディレクティブを指定するためのディレクティブです。
| None | 「.htaccess」ファイルでは、すべてのディレクティブが使用できません。 |
| All | 「.htaccess」ファイルで記述可能なディレクティブをすべて使用できます。 |
httpdサービスの有効化
httpdサービスを有効化し起動します。
[root@localhost ~]# systemctl enable httpd.service
Created symlink /etc/systemd/system/multi-user.target.wants/httpd.service → /usr/lib/systemd/system/httpd.service.
[root@localhost ~]# systemctl start httpd.service
[root@localhost ~]# systemctl status httpd.service
● httpd.service - The Apache HTTP Server
     Loaded: loaded (/usr/lib/systemd/system/httpd.service; enabled; preset: disabled)
     Active: active (running) since Mon 2025-08-11 19:24:12 JST; 6s ago
       Docs: man:httpd.service(8)
   Main PID: 11869 (httpd)
     Status: "Started, listening on: port 80"
      Tasks: 177 (limit: 10908)
     Memory: 35.2M
        CPU: 124ms
     CGroup: /system.slice/httpd.service
             tq11869 /usr/sbin/httpd -DFOREGROUND
             tq11870 /usr/sbin/httpd -DFOREGROUND
             tq11871 /usr/sbin/httpd -DFOREGROUND
             tq11872 /usr/sbin/httpd -DFOREGROUND
             mq11873 /usr/sbin/httpd -DFOREGROUND

 8月 11 19:24:12 svr20250810.ingenious.jp systemd[1]: Starting The Apache HTTP Server...
 8月 11 19:24:12 svr20250810.ingenious.jp systemd[1]: Started The Apache HTTP Server.
 8月 11 19:24:12 svr20250810.ingenious.jp httpd[11869]: Server configured, listening on: port 80
[root@localhost ~]#
PHPのインストール
PHP 8.3は、標準リポジトリでは提供されていないため、ここでは、Remiリポジトリを使用して、PHP 8.3をインストールします。
【備考】
EPELは、Extra Packages for Enterprise Linuxの略で、エンタープライズLinux用の高品質な追加パッケージセットが含まれているリポジトリです。Red Hat Enterprise Linux (RHEL)、CentOS、Scientific Linux (SL)、Oracle Linux (OL)、AlmaLinux (AL)、および Rocky Linux (RL)などで使用することができますが、これらに限定されるものではありません。
注意が必要なことは、標準のリポジトリで提供されていないモジュールを使用することができますが、Red Hat社などからのサポートはなく、「自己責任のもとで使用」する必要があります。
詳細は、以下の公式ホームページに記載されていますのでご確認ください。
【参考】
Remiリポジトリは、Remi Collect氏が提供しているリポジトリで、様々なPHPバージョンのパッケージが提供されています。FedoraやEnterprise Linux(RHEL、CentOS、Oracle、Scientific Linux など) で使用できる最新バージョンのPHPスタックやその他のソフトウェアが提供されています。EPELリポジトリと同様に、「自己責任のもとで使用」する必要があります。
詳細は、以下の公式ホームページに記載されていますのでご確認ください。
Remi Repository
【注意】
Remiリポジトリを使用するためには、事前にEPELリポジトリを追加する必要があります。
EPELリポジトリ、Remiリポジトリの追加
EPELリポジトリを追加します。
[root@localhost ~]# dnf config-manager --set-enabled crb
[root@localhost ~]# dnf install https://dl.fedoraproject.org/pub/epel/epel-release-latest-9.noarch.rpm
Remiリポジトリを追加します。
[root@localhost ~]# dnf install https://rpms.remirepo.net/enterprise/remi-release-9.rpmリポジトリが追加されたことを確認します。
[root@localhost ~]# dnf repolist
repo id              repo の名前
appstream                                               AlmaLinux 9 - AppStream
baseos                                                  AlmaLinux 9 - BaseOS
crb                                                     AlmaLinux 9 - CRB
epel                                                    Extra Packages for Enterprise Linux 9 - x86_64
epel-cisco-openh264                                     Extra Packages for Enterprise Linux 9 openh264 (From Cisco) - x86_64
extras                                                  AlmaLinux 9 - Extras
remi-modular                                            Remi's Modular repository for Enterprise Linux 9 - x86_64
remi-safe                                               Safe Remi's RPM repository for Enterprise Linux 9 - x86_64
[root@localhost ~]#
提供されているPHPバージョンの確認
追加したリポジトリで提供されているPHPモジュールストリームを確認します。
[root@localhost ~]# dnf module list php
AlmaLinux 9 - AppStream
Name                         Stream                              Profiles                                          Summary
php                          8.1                                 common [d], devel, minimal                        PHP scripting language
php                          8.2                                 common [d], devel, minimal                        PHP scripting language
php                          8.3                                 common [d], devel, minimal                        PHP scripting language

Remi's Modular repository for Enterprise Linux 9 - x86_64
Name                         Stream                              Profiles                                          Summary
php                          remi-7.4                            common [d], devel, minimal                        PHP scripting language
php                          remi-8.0                            common [d], devel, minimal                        PHP scripting language
php                          remi-8.1                            common [d], devel, minimal                        PHP scripting language
php                          remi-8.2                            common [d], devel, minimal                        PHP scripting language
php                          remi-8.3                            common [d], devel, minimal                        PHP scripting language
php                          remi-8.4                            common [d], devel, minimal                        PHP scripting language

ヒント: [d]efault, [e]nabled, [x]disabled, [i]nstalled
[root@localhost ~]#
PHPモジュールストリームの切り替え
PHPのインストールで使用するPHPモジュールのストリーム(バージョン)を切り替えます。
切り替えた後は、PHPモジュールのストリーム(バージョン)を指定することなく、指定したPHPモジュールのストリーム(バージョン)から各種モジュールをインストールすることができます。
ここでは、PHPモジュールの「remi-8.3」ストリームを使用します。
[root@localhost ~]# dnf module reset php  <-- 現在の設定をリセット
[root@localhost ~]# dnf module enable php:remi-8.3  <-- 「remi-8.3」を指定
メタデータの期限切れの最終確認: 0:01:50 前の 2025年08月11日 20時36分56秒 に実施しました。
依存関係が解決しました。
================================================================================================================================================================
 パッケージ                            アーキテクチャー                     バージョン                              リポジトリー                          サイズ
================================================================================================================================================================
モジュールストリームの有効化中:
 php                                                                        remi-8.3

トランザクションの概要
================================================================================================================================================================

これでよろしいですか? [y/N]: y
完了しました!
[root@localhost ~]#
確認
「remi-8.3」が有効化されていることを確認します。
[root@localhost ~]# dnf module list php
AlmaLinux 9 - AppStream
Name                         Stream                              Profiles                                          Summary
php                          8.1                                 common [d], devel, minimal                        PHP scripting language
php                          8.2                                 common [d], devel, minimal                        PHP scripting language
php                          8.3                                 common [d], devel, minimal                        PHP scripting language

Remi's Modular repository for Enterprise Linux 9 - x86_64
Name                         Stream                              Profiles                                          Summary
php                          remi-7.4                            common [d], devel, minimal                        PHP scripting language
php                          remi-8.0                            common [d], devel, minimal                        PHP scripting language
php                          remi-8.1                            common [d], devel, minimal                        PHP scripting language
php                          remi-8.2                            common [d], devel, minimal                        PHP scripting language
php                          remi-8.3 [e]                        common [d], devel, minimal                        PHP scripting language
php                          remi-8.4                            common [d], devel, minimal                        PHP scripting language

ヒント: [d]efault, [e]nabled, [x]disabled, [i]nstalled
[root@localhost ~]#
PHPのインストール
PHPバージョン8.3をインストールします。以下のように「php」と記載するだけで、前項で指定したPHPモジュールストリームから8.3がインストールされます。
[root@localhost ~]# dnf install phpPHP8.3がインストールされたことを確認します。
[root@localhost ~]# php -v
PHP 8.3.24 (cli) (built: Jul 29 2025 15:48:33) (NTS gcc x86_64)
Copyright (c) The PHP Group
Zend Engine v4.3.24, Copyright (c) Zend Technologies
    with Zend OPcache v8.3.24, Copyright (c), by Zend Technologies
[root@localhost ~]#
必要なライブラリやPHPモジュールのインストール
WordPressを稼働させるために必要なライブラリモジュールやPHPモジュールをインストールします。
[root@localhost ~]# dnf install libcurl libxml2 pcre ImageMagick libicu libzip libexif libmemcached-awesome[root@localhost ~]# dnf install php-intl php-mbstring php-xml php-pecl-zip php-pecl-imagick-im7 php-gd
[root@localhost ~]# dnf install php-pecl-apcu php-pecl-memcache php-opcache php-phpiredis
[root@localhost ~]# dnf install php-mysqlnd【参考】
WordPressの要件は、公式ホームページの「Server Environment」に記載されていますので、ご参照下さい。
PHPの設定
「/etc/php.ini」ファイルを以下のとおり変更します。
[root@localhost ~]# vi /etc/php.ini

【変更内容】
[mbstring]
; language for internal character representation.
; This affects mb_send_mail() and mbstring.detect_order.
; https://php.net/mbstring.language
mbstring.language = Japanese  <-- Japaneseに設定

; Maximum amount of memory a script may consume
; https://php.net/memory-limit
memory_limit = 128M  <-- 128MBに設定

; Maximum size of POST data that PHP will accept.
; Its value may be 0 to disable the limit. It is ignored if POST data reading
; is disabled through enable_post_data_reading.
; https://php.net/post-max-size
;post_max_size = 8M  <-- コメントアウト
post_max_size = 40M  <-- 40MBに設定

; Maximum allowed size for uploaded files.
; https://php.net/upload-max-filesize
; upload_max_filesize = 2M  <-- コメントアウト
upload_max_filesize = 30M  <-- 30MBに設定

[root@localhost ~]#
「memory_limit」、「post_max_size」、「upload_max_filesize」の初期の設定値では、サイズの大きなテーマをアップロードした場合にエラーになる場合があります。このため、設定変更を行います。各設定値は、「memory_limit」の数値が一番大きく、続いて、「post_max_size」の数値、そして、「upload_max_filesize」が一番小さい数値になるよう調整する必要があります。
php-fpmのインストール
Apache2サーバでPHPを使用する際に必要になるphp-fpmのインストールを行います。
php-fpmは、FPM(FastCGI Process Manager)と言われるPHPのFastCGI実装のひとつです。
[root@localhost ~]# dnf install php-fpmphp-fpmをインストールすると特に設定変更を行うことなく、PHPが使用できるようになります。「/etc/httpd/conf.d/php.conf」ファイルで以下のように記載されているため、「mod_php*」がインストールされていない場合、php-fpmが使用される設定になっています。
[root@localhost ~]# cat /etc/httpd/conf.d/php.conf
    ~(省略)~
# Redirect to local php-fpm if mod_php (5 or 7) is not available
<IfModule !mod_php5.c>
  <IfModule !mod_php7.c>
    <IfModule !mod_php.c>
      # Enable http authorization headers
      SetEnvIfNoCase ^Authorization$ "(.+)" HTTP_AUTHORIZATION=$1

      <FilesMatch \.(php|phar)$>
          SetHandler "proxy:unix:/run/php-fpm/www.sock|fcgi://localhost"
      </FilesMatch>
    </IfModule>
  </IfModule>
</IfModule>
[root@localhost ~]#
php-fpmサービスの有効化
php-fpmサービスを有効化し起動します。
[root@localhost ~]# systemctl enable php-fpm.service
Created symlink /etc/systemd/system/multi-user.target.wants/php-fpm.service → /usr/lib/systemd/system/php-fpm.service.
[root@localhost ~]# systemctl start php-fpm.service
[root@localhost ~]# systemctl status php-fpm.service
● php-fpm.service - The PHP FastCGI Process Manager
     Loaded: loaded (/usr/lib/systemd/system/php-fpm.service; enabled; preset: disabled)
     Active: active (running) since Mon 2025-08-11 20:58:21 JST; 6s ago
   Main PID: 19411 (php-fpm)
     Status: "Ready to handle connections"
      Tasks: 6 (limit: 10908)
     Memory: 21.0M
        CPU: 111ms
     CGroup: /system.slice/php-fpm.service
             tq19411 "php-fpm: master process (/etc/php-fpm.conf)"
             tq19412 "php-fpm: pool www"
             tq19413 "php-fpm: pool www"
             tq19414 "php-fpm: pool www"
             tq19415 "php-fpm: pool www"
             mq19416 "php-fpm: pool www"

 8月 11 20:58:21 svr20250810.ingenious.jp systemd[1]: Starting The PHP FastCGI Process Manager...
 8月 11 20:58:21 svr20250810.ingenious.jp systemd[1]: Started The PHP FastCGI Process Manager.
[root@localhost ~]#
PHPの動作確認
以下のテスト用ファイル「test.php」をドキュメントルート「/var/www/html」に作成し、PHPの動作確認を行います。
[root@localhost ~]# vi /var/www/html/test.php
【記載内容】
<?php
phpinfo();
?>
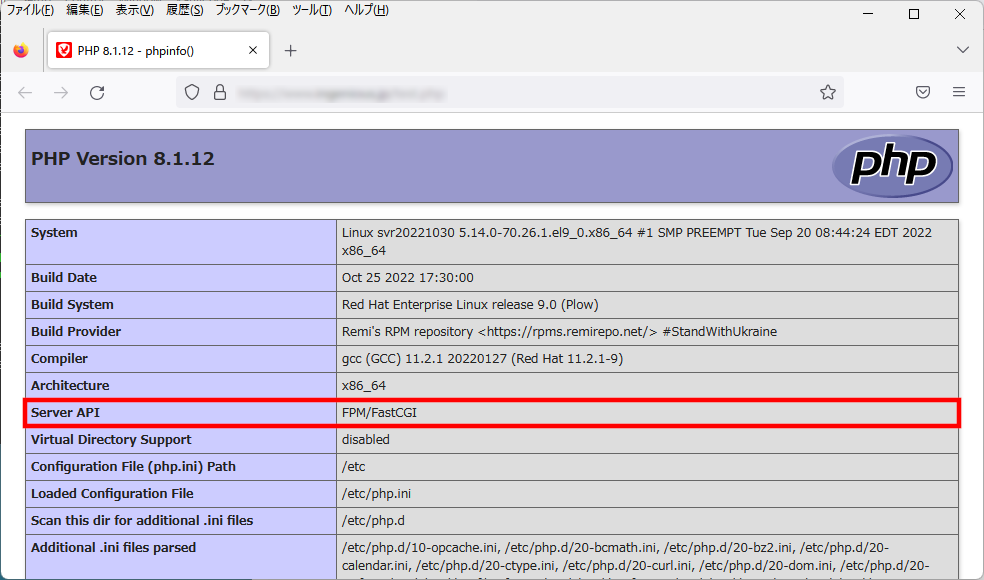
[root@localhost ~]#Webブラウザを使用して、以下のURLにアクセスし、PHPの各種情報が表示されることを確認します。
「Server API」欄を確認し、「FPM/FastCGI」と記載されていれば、「php-fpm」が使用されています。
URL:http://<IPアドレス または、ドメイン名>/test.php
MariaDB Serverのインストール
MariaDB Serverのインストール
「MariaDB Server 11.8」は、標準リポジトリでは提供されていないため、MariaDBリポジトリを使用してインストールします。
「/etc/yum.repos.d」ディレクトリに、「MariaDB.repo」レポジトリファイルを作成します。
※リポジトリファイルへの記載内容は、「MariaDB Foundation」公式サイトを参照してください。
[root@localhost ~]# vi /etc/yum.repos.d/MariaDB.repo
【記載内容】
# MariaDB 11.8 RedHatEnterpriseLinux repository list - created 2025-08-11 04:54 UTC
# https://mariadb.org/download/
[mariadb]
name = MariaDB
# rpm.mariadb.org is a dynamic mirror if your preferred mirror goes offline. See https://mariadb.org/mirrorbits/ for details.
# baseurl = https://rpm.mariadb.org/11.8/rhel/$releasever/$basearch
baseurl = https://ftp.yz.yamagata-u.ac.jp/pub/dbms/mariadb/yum/11.8/rhel/$releasever/$basearch
# gpgkey = https://rpm.mariadb.org/RPM-GPG-KEY-MariaDB
gpgkey = https://ftp.yz.yamagata-u.ac.jp/pub/dbms/mariadb/yum/RPM-GPG-KEY-MariaDB
gpgcheck = 1
[root@localhost ~]#
「MariaDB Server」、「MariaDB Client」をインストールします。
[root@localhost ~]# dnf install MariaDB-server MariaDB-clientインストールしたMariaDBサーバのバージョンを確認します。
[root@localhost ~]#  mariadbd --version
mariadbd  Ver 11.8.3-MariaDB for Linux on x86_64 (MariaDB Server)
[root@localhost ~]#
MariaDB Serverの初期設定
MariaDB Serverで使用する「文字セット」、「照合順序」を設定します。
[root@localhost ~]# vi /etc/my.cnf.d/server.cnf
【編集内容】
~(省略)~
# This group is only read by MariaDB servers, not by MySQL.
# If you use the same .cnf file for MySQL and MariaDB,
# you can put MariaDB-only options here
[mariadb]
character-set-server=utf8mb4  <-- 追記(文字セットの指定)
collation-server=utf8mb4_unicode_ci  <-- 追記(照合順序の指定)
~(省略)~
[root@localhost ~]#
MariaDB Clientで使用する「デフォルト文字セット」を設定します。
[root@localhost ~]# vi /etc/my.cnf.d/client.cnf
【編集内容】
[client]

# This group is not read by mysql client library,
# If you use the same .cnf file for MySQL and MariaDB,
# use it for MariaDB-only client options
[client-mariadb]
default-character-set=utf8mb4  <-- 追記(デフォルト文字セットの指定)

[root@localhost ~]#
MariaDB Serverサービスの有効化と起動
MariaDB Serverサービスを有効化し起動します。
[root@localhost ~]# systemctl enable mariadb.service
Created symlink /etc/systemd/system/multi-user.target.wants/mariadb.service → /usr/lib/systemd/system/mariadb.service.
[root@localhost ~]# systemctl start mariadb.service
[root@localhost ~]# systemctl status mariadb.service
● mariadb.service - MariaDB 11.8.3 database server
     Loaded: loaded (/usr/lib/systemd/system/mariadb.service; enabled; preset: disabled)
    Drop-In: /etc/systemd/system/mariadb.service.d
             mqmigrated-from-my.cnf-settings.conf
     Active: active (running) since Mon 2025-08-11 21:16:25 JST; 33min ago
       Docs: man:mariadbd(8)
             https://mariadb.com/kb/en/library/systemd/
    Process: 915 ExecStartPre=/bin/sh -c [ ! -e /usr/bin/galera_recovery ] && VAR= ||   VAR=`/usr/bin/galera_recovery`; [ $? -eq 0 ]   && echo >
    Process: 1616 ExecStartPost=/bin/rm -f /var/lib/mysql/wsrep-start-position (code=exited, status=0/SUCCESS)
   Main PID: 970 (mariadbd)
     Status: "Taking your SQL requests now..."
      Tasks: 8 (limit: 13498)
     Memory: 153.5M
        CPU: 344ms
     CGroup: /system.slice/mariadb.service
             mq970 /usr/sbin/mariadbd

 8月 11 21:16:22 svr.ingenious.jp mariadbd[970]: 2025-08-11 21:16:22 0 [Note] Plugin 'wsrep-provider' is disabled.
 8月 11 21:16:22 svr.ingenious.jp mariadbd[970]: 2025-08-11 21:16:22 0 [Note] InnoDB: Buffer pool(s) load completed at 250811 21:16:22
 8月 11 21:16:25 svr.ingenious.jp mariadbd[970]: 2025-08-11 21:16:25 0 [Note] Server socket created on IP: '0.0.0.0', port: '3306'.
 8月 11 21:16:25 svr.ingenious.jp mariadbd[970]: 2025-08-11 21:16:25 0 [Note] Server socket created on IP: '::', port: '3306'.
 8月 11 21:16:25 svr.ingenious.jp mariadbd[970]: 2025-08-11 21:16:25 0 [Note] mariadbd: Event Scheduler: Loaded 0 events
 8月 11 21:16:25 svr.ingenious.jp mariadbd[970]: 2025-08-11 21:16:25 0 [Note] /usr/sbin/mariadbd: ready for connections.
 8月 11 21:16:25 svr.ingenious.jp mariadbd[970]: Version: '11.8.3-MariaDB'  socket: '/var/lib/mysql/mysql.sock'  port: 3306  MariaDB Se>
 8月 11 21:16:25 svr.ingenious.jp systemd[1]: Started MariaDB 11.8.3 database server.
 8月 11 21:30:21 svr.ingenious.jp mariadbd[970]: 2025-08-11 21:30:21 3 [Warning] Access denied for user 'maint'@'localhost'
 8月 11 21:30:31 svr.ingenious.jp mariadbd[970]: 2025-08-11 21:30:31 4 [Warning] Access denied for user 'maint'@'localhost'
[root@localhost ~]#
MariaDB Serverのセキュリティ設定
「mariadb-secure-installation」スクリプトを使用して、MariaDB Serverのセキュリティ設定を行います。
[root@localhost ~]# mysql_secure_installation
NOTE: RUNNING ALL PARTS OF THIS SCRIPT IS RECOMMENDED FOR ALL MariaDB
      SERVERS IN PRODUCTION USE!  PLEASE READ EACH STEP CAREFULLY!

In order to log into MariaDB to secure it, we'll need the current
password for the root user. If you've just installed MariaDB, and
haven't set the root password yet, you should just press enter here.

Enter current password for root (enter for none):
OK, successfully used password, moving on...

Setting the root password or using the unix_socket ensures that nobody
can log into the MariaDB root user without the proper authorisation.

You already have your root account protected, so you can safely answer 'n'.

Switch to unix_socket authentication [Y/n] Y
Enabled successfully!
Reloading privilege tables..
 ... Success!

You already have your root account protected, so you can safely answer 'n'.

Change the root password? [Y/n] n
 ... skipping.

By default, a MariaDB installation has an anonymous user, allowing anyone
to log into MariaDB without having to have a user account created for
them.  This is intended only for testing, and to make the installation
go a bit smoother.  You should remove them before moving into a
production environment.

Remove anonymous users? [Y/n] Y
 ... Success!

Normally, root should only be allowed to connect from 'localhost'.  This
ensures that someone cannot guess at the root password from the network.

Disallow root login remotely? [Y/n] Y
 ... Success!

By default, MariaDB comes with a database named 'test' that anyone can
access.  This is also intended only for testing, and should be removed
before moving into a production environment.

Remove test database and access to it? [Y/n] Y
 - Dropping test database...
 ... Success!
 - Removing privileges on test database...
 ... Success!

Reloading the privilege tables will ensure that all changes made so far
will take effect immediately.

Reload privilege tables now? [Y/n] Y
 ... Success!

Cleaning up...

All done!  If you've completed all of the above steps, your MariaDB
installation should now be secure.

Thanks for using MariaDB!
[root@localhost ~]#
MariaDB Serverへの接続確認
「mariadb」コマンドを使用して、MariaDB Serverへ接続できることを確認します。
[root@localhost ~]# mariadb -uroot -p
Enter password:
Welcome to the MariaDB monitor.  Commands end with ; or \g.
Your MariaDB connection id is 6
Server version: 11.8.3-MariaDB MariaDB Server

Copyright (c) 2000, 2018, Oracle, MariaDB Corporation Ab and others.

Type 'help;' or '\h' for help. Type '\c' to clear the current input statement.

MariaDB [(none)]> exit
Bye
[root@localhost ~]#
WordPressのインストール
WordPressのダウンロード
公式ホームページから最新バージョンのWordPressパッケージをダウンロードします。
[root@localhost ~]# wget https://ja.wordpress.org/latest-ja.tar.gz
[root@localhost ~]#
「latest-ja.tar.gz」ファイルがダウンロードされます。
[root@localhost ~]# ls -l
合計 21452
-rw-r--r--  1 root root 21961019 10月 23 11:00 latest-ja.tar.gz
[root@localhost ~]#
ダウンロードしたファイル「latest-ja.tar.gz」を解凍します。
[root@localhost ~]# tar zxvf latest-ja.tar.gz以下のように「wordpress」というディレクトリが作成されます。
[root@localhost ~]# ls -l
合計 21456
-rw-r--r--  1 root root 21961019 10月 23 11:00 latest-ja.tar.gz
drwxr-xr-x  5 1006 1006     4096 10月 23 11:00 wordpress
[root@localhost ~]#
WordPress用のデータベースおよびユーザーの作成
MySQLコマンドを使用して、WordPress用で使用するデータベースを作成します。
ここでは、データベース名を「db_wordpress」、ユーザー名を「wp_user」、パスワードを「password」とします。
[root@localhost ~]# mysql -uroot -p
Enter password:
Welcome to the MySQL monitor.  Commands end with ; or \g.
Your MySQL connection id is 9
Server version: 8.0.30 Source distribution

Copyright (c) 2000, 2022, Oracle and/or its affiliates.

Oracle is a registered trademark of Oracle Corporation and/or its
affiliates. Other names may be trademarks of their respective
owners.

Type 'help;' or '\h' for help. Type '\c' to clear the current input statement.

mysql> CREATE DATABASE db_wordpress;
Query OK, 1 row affected (0.01 sec)

mysql> CREATE USER 'wp_user'@'localhost' IDENTIFIED BY 'password';
Query OK, 0 rows affected (0.01 sec)

mysql> GRANT ALL PRIVILEGES ON db_wordpress.* TO 'wp_user'@'localhost';
Query OK, 0 rows affected (0.00 sec)

mysql> FLUSH PRIVILEGES;
Query OK, 0 rows affected (0.00 sec)

mysql> quit
Bye
[root@localhost ~]#
wp-config.phpファイルの作成
WordPressの設定は、「wp-config.php」設定ファイルを事前に作成する方法とインストールスクリプトを使用する方法がありますが、本記事では、インストール・スクリプトを使用して設定を行います。
WordPressのファイルのアップロード
本記事では、Apache2サーバのドキュメントルート「/var/www/html/」に、WordPressのファイルをアップロード(コピー)します。
[root@localhost ~]# cp -R ./wordpress/* /var/www/html/
[root@localhost ~]#
【注意】
アップロードするWordPressのファイルは、「wordpress」ディレクトリ自体ではなく、「wordpress」ディレクトリの内容です。
WordPressファイルの権限設定
Apache2サーバのドキュメントルートにアップロードしたWordPressファイルの権限設定を行います。Apache2サーバの実行ユーザー(apache)の権限を設定します。
[root@localhost ~]# chown -R apache:apache /var/www/html/
[root@localhost ~]#
WordPressの初期セットアップ
ここでは、インストール・スクリプトを使用して、初期セットアップを行います。
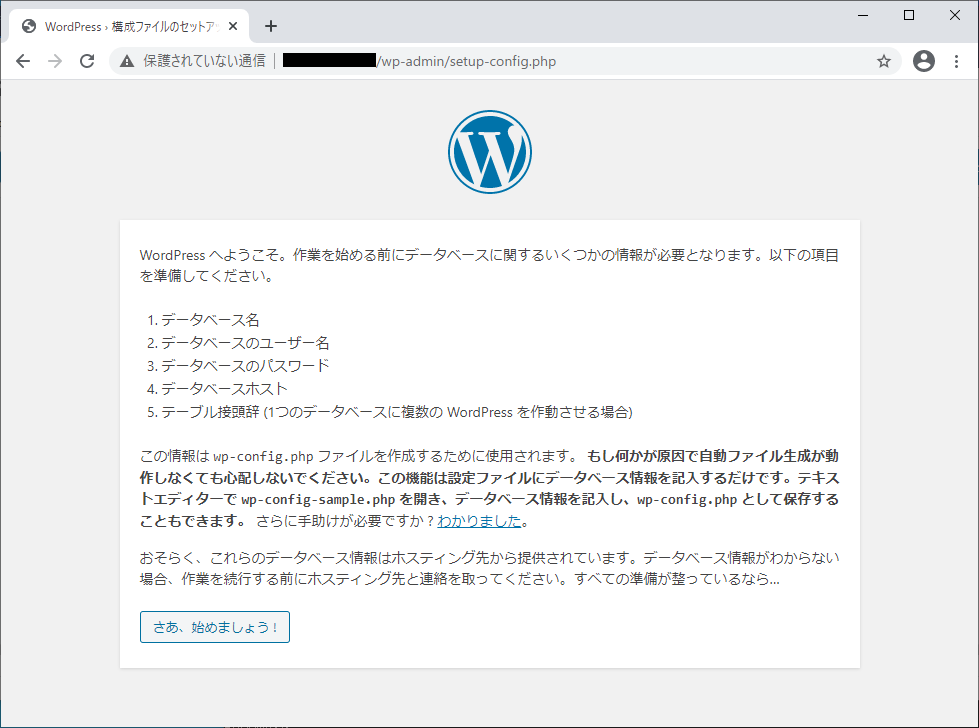
Webブラウザを使用して、以下のURLにアクセスします。
URL:http://<IPアドレス または、ドメイン名>/wp-admin/install.php
以下の画面が表示されますので、「さあ、始めましょう!」をクリックします。
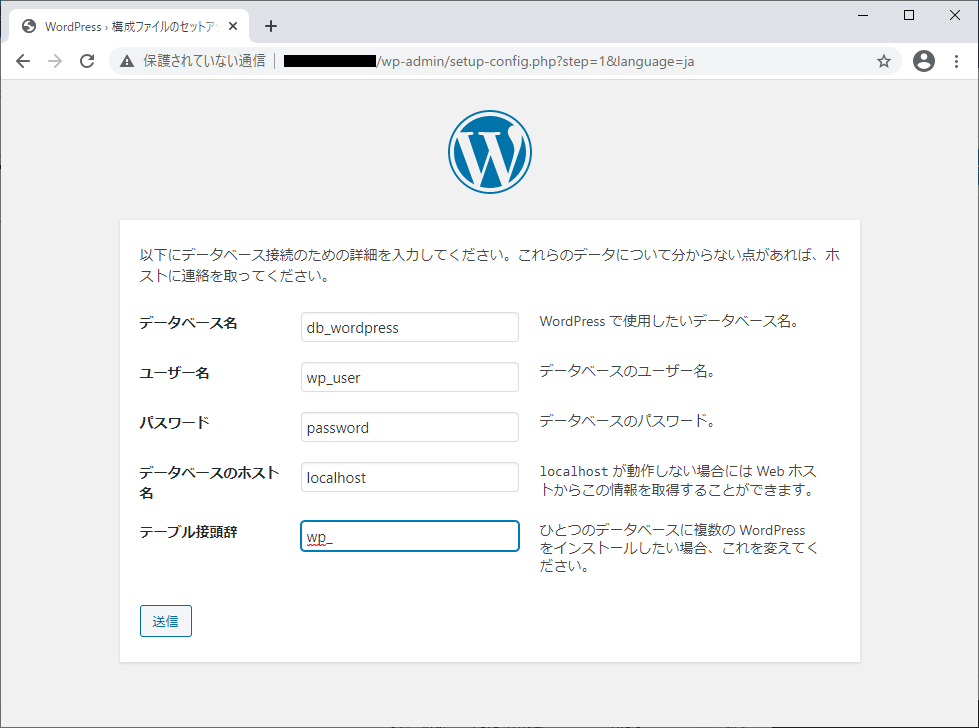
以下の画面が表示されますので、「データベース名」、「ユーザー名」、「パスワード」、「データベースのホスト」の各入力欄に、先ほど作成したデータベース及びユーザーに関する情報を入力します。「テーブル接頭辞」は、特に理由がない限り、変更の必要はありません。
入力が完了したら、「送信」をクリックします。
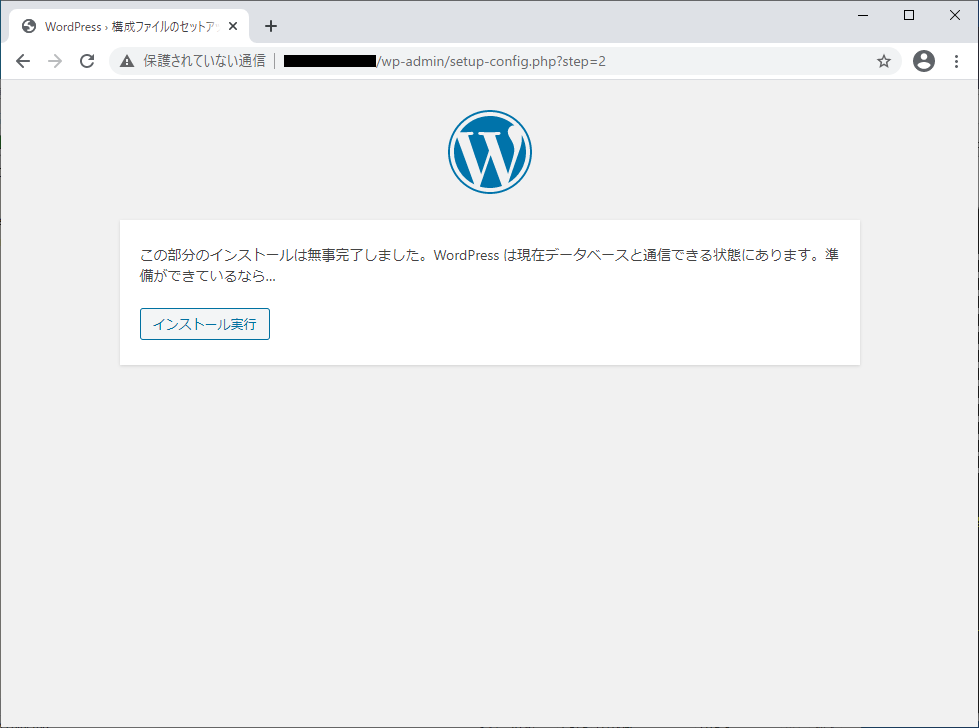
以下の画面が表示されますので、「インストール実行」をクリックします。
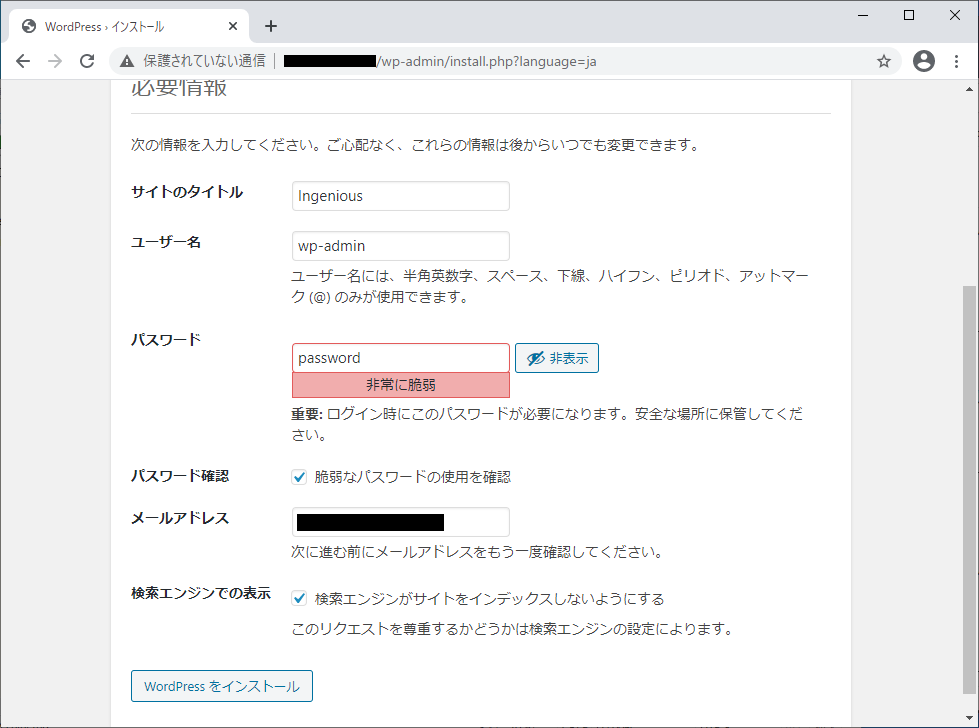
以下の「ようこそ」という画面が表示されますので、WordPressサイトの設定情報を入力します。
ここでは、サイトのタイトルを「Ingenious」、ユーザー名を「wp-admin」、パスワードを「password」、メールアドレスを「***@***.***.jp」とします。
入力するサイトの設定情報は、適宜、環境に応じて入力してください。
入力が完了したら、「WordPressをインストール」をクリックします。
【注意】
ここで入力するユーザー名は、WordPressサイトの管理者のユーザー名です。
前項で作成したデータベースで使用するユーザー名とは異なりますので、注意してください。
【参考】
WordPressのテスト環境などの場合は、誤って検索エンジンにサイトがインデクスされないように、「検索エンジンがサイトをインデックスしないようにする」チェックを付けることをお勧めします。
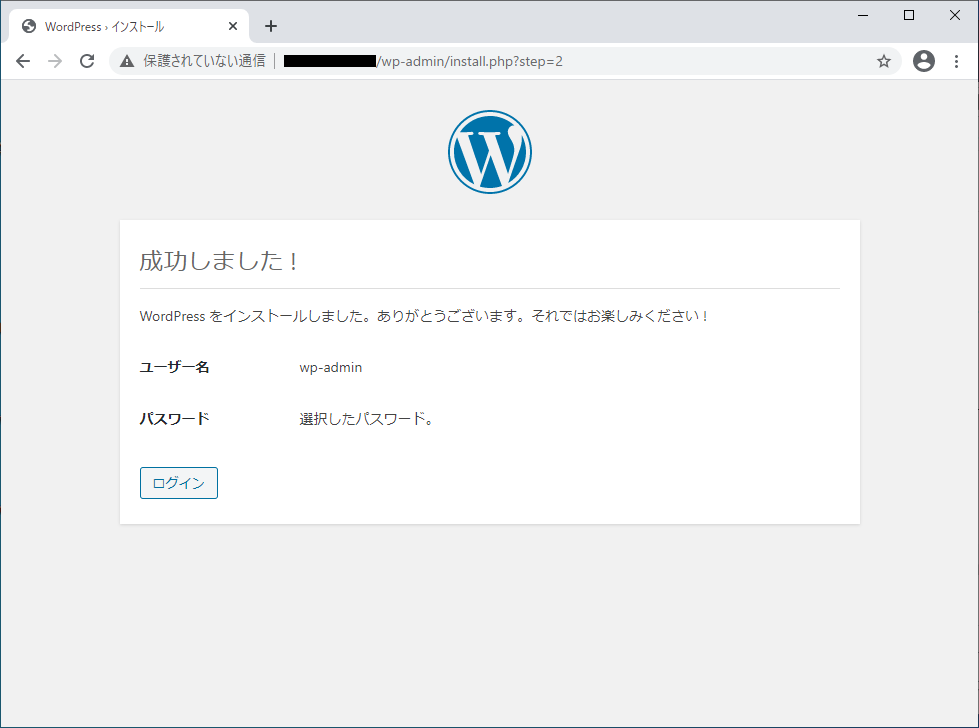
以下の画面が表示されれば、WordPressのインストールは完了です。
「ログイン」をクリックします。
先ほど入力した「ユーザー名」及び「パスワード」を入力し、「ログイン」をクリックします。
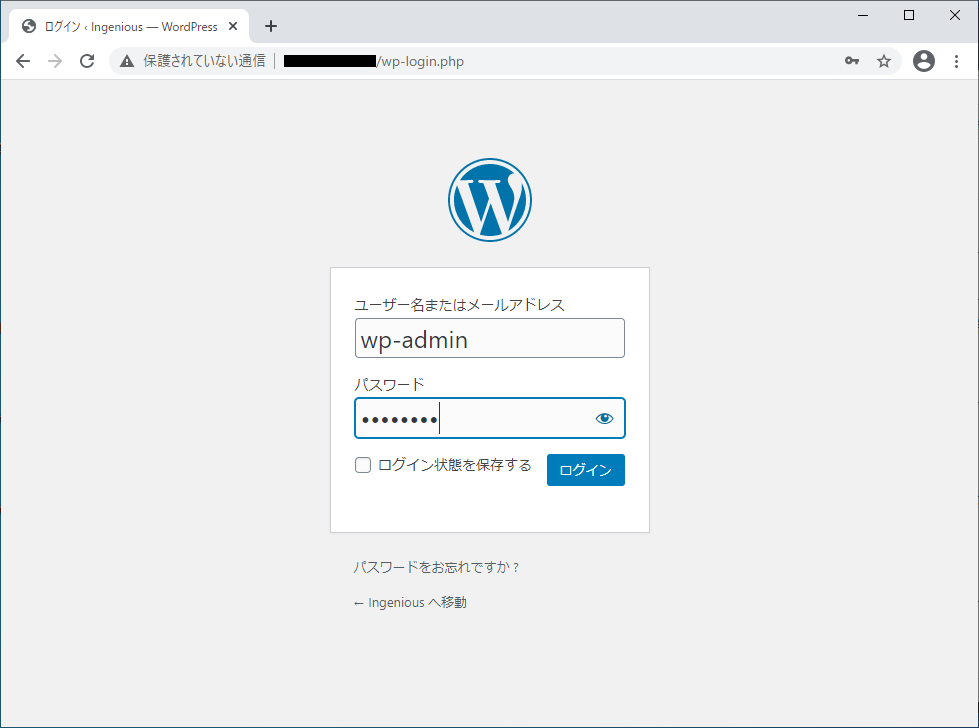
WordPressの管理画面が表示されれば、WordPressのインストールは完了です。